Here are five killer ideas that combine the edgy spirit of goth with a touch of unexpected prettiness. Get ready to turn heads and unleash your inner darkness (in the most stylish way possible, of course).
Goth Aesthetic + Nail Art
Goth nail art embodies the dark and dramatic spirit of the subculture. Deep, sultry colors like black, crimson, and midnight blue form the base, often accented with bold patterns like spiderwebs, crosses, or even delicate lace. While the overall look leans dark, a touch of elegance keeps it from being purely macabre. Think shimmering metallics, intricate nail art designs, or even a single, perfectly placed jewel for a touch of unexpected refinement.

by @chaunlegend
- #1. Stained Glass Nails:
Clear base with intricate stained glass pattern, inspired by the holy vitrage in the church.
Let’s start with an alluring, vitrage-inspired nail look for all the Church Aesthetic appreciators. Get the look by playing with vibrant jewel tones and metallic outlines to create the illusion of miniature stained glass masterpieces on each nail. This dazzling look is sure to turn heads but be warned – achieving those perfect details requires a steady hand and some nail art practice, making it best suited for the more experienced nail enthusiast.
How to Create the Stained Glass Effect on Your Nails
Translucent foundation: Apply a thin layer of clear or slightly translucent nail polish as the base for your stained glass design. Let it dry completely.
Web of colors: Using your thin nail art brush, carefully paint a network of geometric shapes and lines on your nails. Play with different colors and experiment with creating sections of varying sizes.
Metallic accents (optional): For an extra touch of stained glass authenticity, dip your dotting tool (or the tip of your thin brush) in a metallic polish and add small dots or outlines to your colored sections.
Filling the gaps: Once your web of lines is complete, use your chosen colors to fill in the sections you created. Be patient and use thin layers for better control.
Seal the deal: After everything is dry, apply a generous layer of top coat to protect your artwork and add a beautiful shine.

#2. Insectarium Exhibition Nail Design:
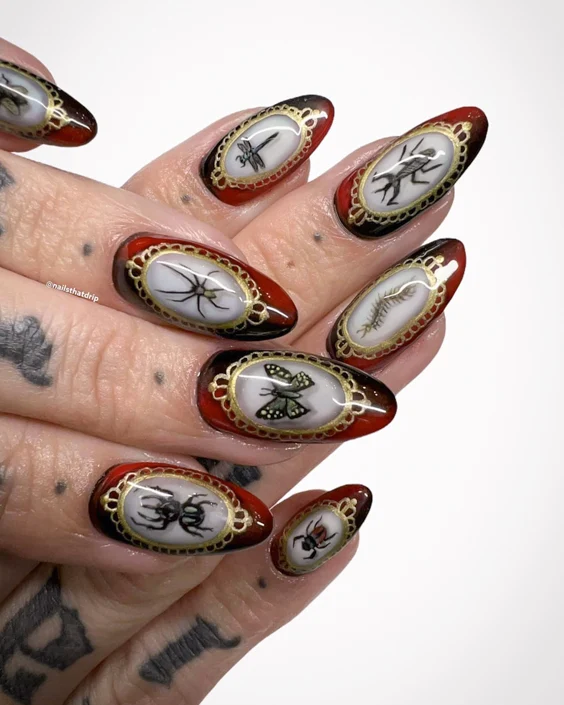
Deep red and black base with a gold oval shape and a small insect on a white background.
If stained glass nails don’t appeal to you, try to channel your inner entomologist with the captivating “Insectarium Exhibition” nail design. Imagine a museum display brought to life at your fingertips. Start with a base of deep, luxurious red – a color reminiscent of the plush velvet lining in antique insect displays. Then, on each nail, paint a bold black oval in the center, creating a window into a miniature world.
Paint a delicate white background, and then the star of the show – a tiny, intricately detailed insect. Choose a realistic beetle, a graceful butterfly, or a curious spider – the possibilities are endless.
How to Create the Insectarium Nails
Prepped and Polished: Apply a base coat to clean, and dry nails. Let it dry completely, then paint two thin coats of your deep red polish for an opaque and luxurious base.
The Insectarium Window: Using your black polish and a thin nail art brush, carefully paint a clean oval shape in the center of each nail. This will act as the “window” into your miniature insect exhibit. Let the black dry completely.
A Blank Canvas: Within the black oval, use your white polish to create a small, clean rectangle or circle as the background for your insect.
Star of the Show: Now comes the fun part! Using your thin nail art brush, meticulously paint a small insect of your choice onto the white background. You can find inspiration online or in insect field guides for realistic details.
Metallic Accents (Optional): For an extra touch of realism and dimension, grab your dotting tool (or the tip of a bobby pin) and dip it into your gold polish. Carefully add tiny dots for details like eyes or spots on the wings of your insect.
Seal the Deal: Once everything is completely dry, apply a generous layer of top coat to protect your miniature insectarium and add a beautiful glossy finish.

#3. Joan of Arc Nail Look for Orléans’ Goths:
See-through stiletto nails with “stainless steel” swords painted on.
How to Create the Joan of Arc Nail Design?
Prep is Key: Start with clean, dry nails. Gently push back your cuticles and apply a base coat for better polish adherence. Let it dry completely. For an extra touch of subtle color, you can apply one thin coat of clear or sheer nude polish after the base coat dries.
Stiletto Statement: If you don’t already have stiletto nails, consider getting them shaped professionally for this look. You can also use acrylic or press-on nails in a stiletto shape if that’s more convenient.
Sword Art: Here comes the fun part! Using your thin nail art brush and the chrome or holographic silver polish, carefully paint the silhouette of a sword on each nail. Aim for a long, slender shape that tapers towards the tip, mimicking a medieval blade.
*Beginner Tip: If you’re not confident in freehand drawing, you can find nail art stencils online that feature sword designs. Simply apply the stencil to your nail, paint over it with your silver polish, and then carefully peel off the stencil for a clean design.
Polish and Shine: Once the sword art is dry, apply a top coat (optional) for added protection and a beautiful glossy finish.

#4. Black Intricate Lace on Purple Nails:
Muted, matte-purple base with a thin, intense-black lace woven on top.
Just check out this captivating blend of elegance and gothic edge. A base of muted, matte purple – a color that whispers of twilight skies and hidden secrets. This velvety backdrop will be the canvas for an exquisite masterpiece. Somewhat less dramatic, and more daytime-appropriate!
How to Create Black Lace Nail Design?
Prep and Prime: Apply a base coat to clean, dry nails and let it dry completely. This will help with polish adherence and prevent chipping.
Muted Majesty: Paint two thin coats of your matte purple nail polish, ensuring even coverage for a smooth and opaque finish. Dry each nail polish coat completely before the next.
Weaving the Lace: Here comes the intricate part! Using your thin nail art brush, carefully paint a design resembling black lace onto each nail. You can create delicate floral patterns, swirling vines, geometric shapes, or even find inspiration from real lace patterns online.
Beginner Tip: If you’re new to nail art or find freehand drawing challenging, consider using a stamping kit. You can find nail stamping plates with intricate lace designs that can be easily transferred onto your nails using a stamper and scraper.
Level Up Your Lace (Optional): For a truly detailed look, especially with very intricate designs, you can utilize a detailing brush. This allows for even finer lines and sharper details compared to a regular nail art brush.
Seal the Deal (Optional): Since the look utilizes a matte purple base, you may prefer to keep the overall finish matte. However, if you desire a bit of shine, apply a thin layer of top coat after everything is dry. This will also help protect your intricate lace design.

- #5. Nephrite and Silver Goth Nails:
Marble-like, milky-green base with white “veins” and silver crosses, blings, and raw gems all over the nails.
How to Create Nephrite and Silver Goth Nails?
Prep and Base: Apply a base coat to clean it and let it dry completely.
Milky Jade Canvas: Paint two thin coats of your milky green nail polish, ensuring even coverage for an opaque and smooth base that resembles polished nephrite jade. Let each coat dry completely before applying the next.
Swirling Veins: Using your thin nail art brush and white nail polish, carefully paint thin, wispy lines across each nail. These lines should resemble veins or natural markings within the stone and can be swirled or left relatively straight – there’s no need for perfect symmetry here!
Silver Accents (Optional): If you want to incorporate silver crosses, dip your thin nail art brush in silver polish and carefully draw small crosses on specific nails or accentuate the white vein intersections with tiny silver dots.
Bling It On: Now comes the fun part – adding the gothic touch! Using tweezers, carefully pick up small silver rhinestones or studs and place them strategically on your nails. Play with size and placement for a unique look.
*Tip: Apply a tiny dot of top coat to the back of each rhinestone or stud before placing it for better adhesion.
Raw Beauty (Optional): For an extra dose of gothic flair and to mimic the inclusion of raw gemstones, use tweezers to gently place a few tiny crushed nephrite chips onto your nails. Press them lightly into the polish to ensure they adhere.
Seal the Deal: Once everything is dry and in place, apply a generous layer of top coat to seal your design and protect all the embellishments. This will also create a beautiful, glossy finish.


